
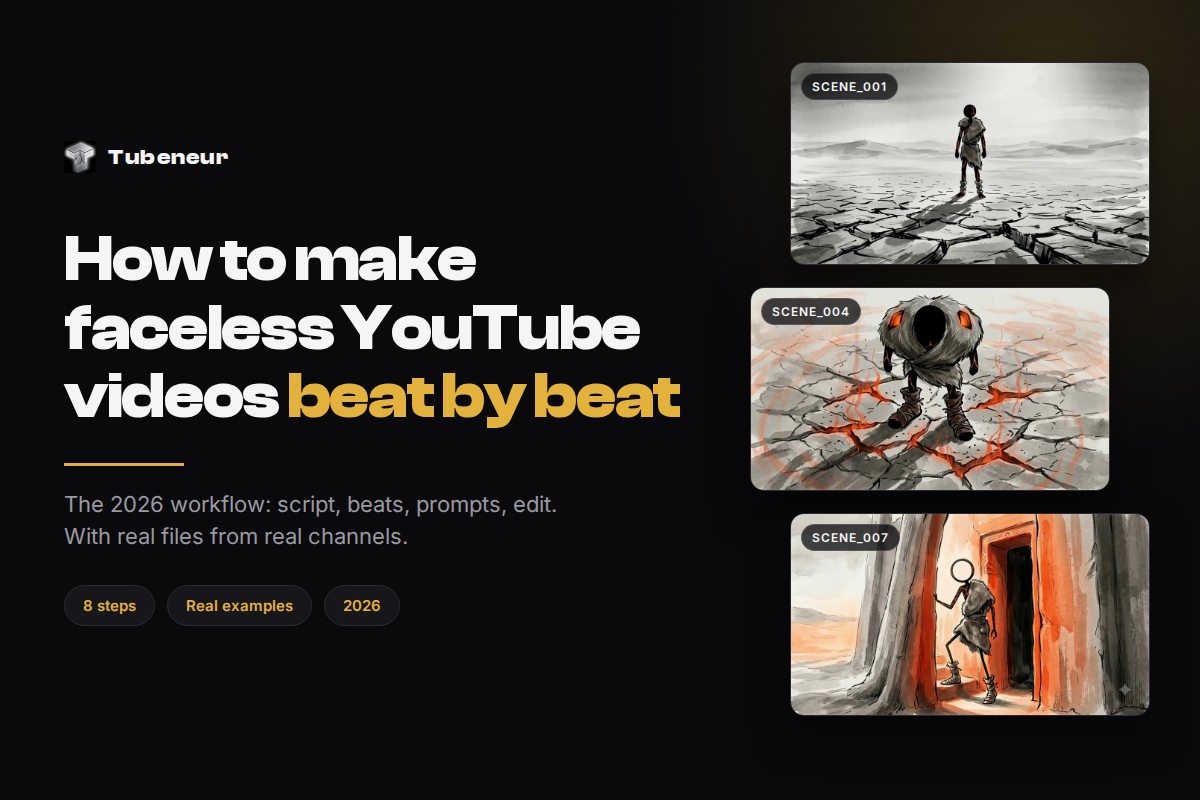
A faceless YouTube video is a video where you never appear on camera. A voice tells a story, and a new picture or clip lands on almost every line. It’s the format behind many history, psychology, science and engineering channels, and it works in almost any niche. You can even make it in a language you don’t speak.
This guide shows how to make faceless YouTube videos in 2026, step by step. It’s the beat-by-beat workflow we use on our own channels, with real files from real projects and the rules YouTube now enforces. It also covers the parts most guides skip: how many pictures a 10-minute video really needs, and how to keep all of them in one style.
The short version
- Every faceless YouTube video is a story told beat by beat: a few spoken words, one picture or clip, then the next.
- Three formats work well: Image Beats (a new illustration on each line), Video Clips (cinematic documentary clips) and Shorts / Reels.
- YouTube doesn’t ban AI or faceless channels. It stops paying for videos that look mass-produced and add nothing original.
- Set your look and storytelling rules once per channel. After that, every video follows them.
- The prep takes most of the hours: script, storyboard and prompts. That’s the part worth turning into a system.
In this guide
- What a faceless YouTube video is (and 3 formats)
- What YouTube allows in 2026
- The 8-step workflow at a glance
- Step 1: Choose a niche and a format
- Step 2: Set up your channel once
- Step 3: Write an original script
- Step 4: Split the script into beats
- Step 5: Write one prompt per beat
- Step 6: Make the pictures, clips and voice
- Step 7: Edit beat by beat
- Step 8: Title, thumbnail and upload
- The same video in another language
- How long it takes
- 7 mistakes that sink faceless channels
- FAQ
What a faceless YouTube video is (and the 3 formats that work)
Every faceless YouTube video has the same skeleton. There’s a narrated script, cut into short pieces, with a visual for each piece. We call each piece a beat. The format decides what fills each beat.
Format 1
Image Beats
A new illustration every few words, all in one drawing style. Good for history, psychology, explainers and storytelling. Images are usually cheaper and faster to make than video clips.
Format 2
Video Clips
A short cinematic clip on each beat, in documentary style. Good for engineering, extreme jobs, nature and travel. It looks more cinematic, but each minute costs more to make.
Format 3
Shorts & Reels
The same beat-by-beat method, made vertical (9:16) with faster pacing. Good for testing ideas and for sending viewers to your long videos.
Both samples were made from Script Pro files. The pictures, clips and voice were made with the creator’s own tools, then edited by hand.
What YouTube allows in 2026 (and what gets demonetized)
Let’s settle this first, because it decides whether the channel can ever earn. YouTube does not ban faceless channels, and it does not ban AI. What it won’t pay for is content that feels mass-produced.
In July 2025, YouTube renamed its old “repetitious content” rule to inauthentic content and made it clearer. A video can lose monetization if it’s repetitive or low-effort. It can also lose it if it’s “AI-generated content made with generic or unoriginal templates” that adds none of the creator’s own insight. A series with the same characters is fine, as long as each episode tells its own story. The full wording is in YouTube’s channel monetization policies.
| Usually fine ✓ | Risky or not monetizable ✗ |
|---|---|
| A recurring art style or cast of characters, with a new story in every video | The same video template with only names or numbers swapped |
| An original script with your own research and angle | A reworded or translated copy of someone else’s video |
| AI pictures or clips that illustrate your own narration | AI visuals over a generic, auto-written script with no point of view |
| The same intro and outro on every video | Clips from shows or other channels stitched together with little narration |
| Using another video as research, then writing something new | Downloading and re-uploading content with only small changes |
Do you need to disclose AI?
YouTube asks you to switch on the altered or synthetic content label when something looks real but isn’t. That covers a realistic scene that never happened, or a real person who seems to say something they didn’t. Content that is clearly unrealistic or animated doesn’t need the label. Neither does using AI to help with your script, outline, title or thumbnail. YouTube also says the label won’t limit a video’s audience or its ability to earn. The rules are on YouTube’s help page, Disclosing use of GenAI content.
Rule of thumb
Illustrated or stick-figure Image Beats channels usually don’t need the label. Realistic AI video that could pass as real footage usually does. If you’re unsure, switch it on. It doesn’t cost you reach.
The 8-step workflow at a glance
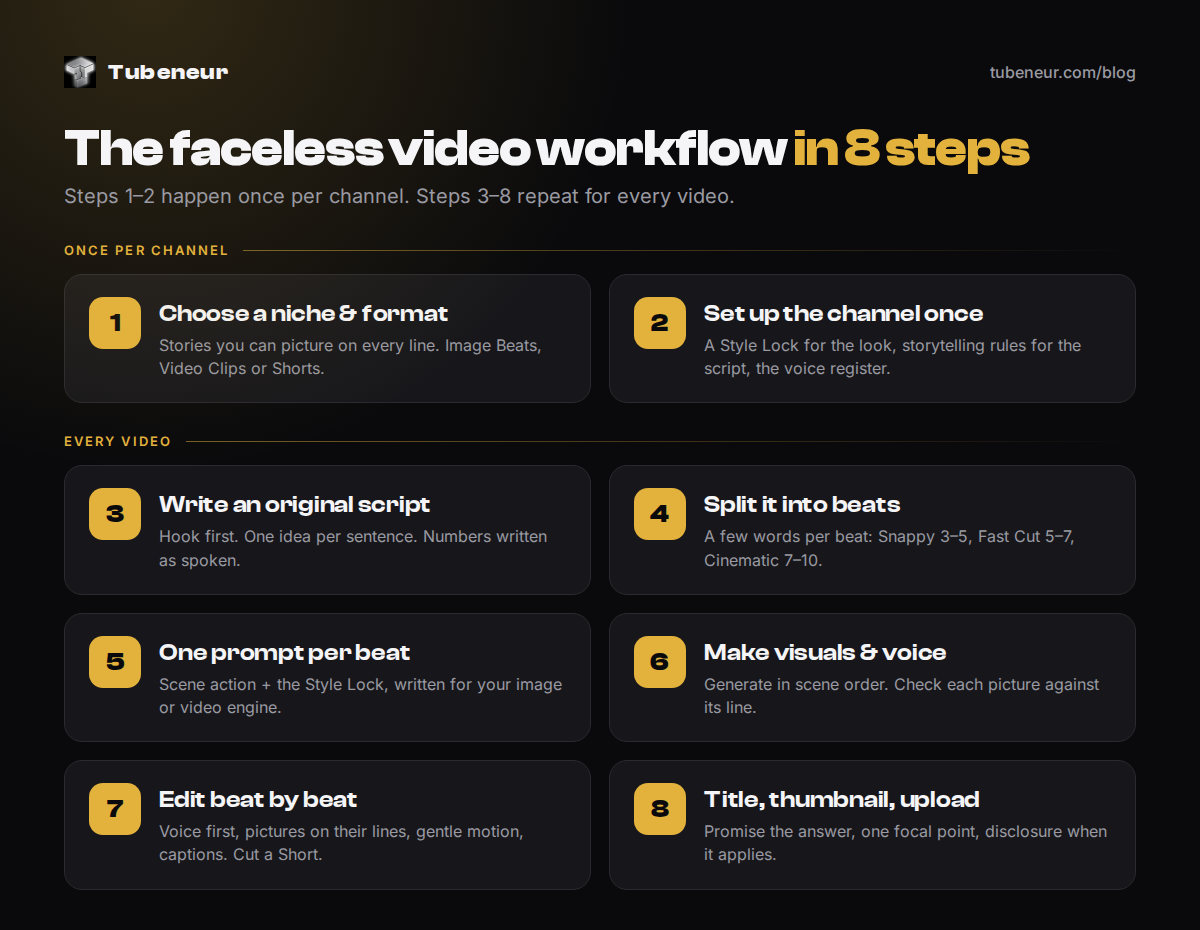
Here’s the full path to make faceless YouTube videos, from idea to upload. Steps 1 and 2 happen once per channel. Steps 3 to 8 repeat for every video.
Step 1: Choose a niche and a format
A good faceless niche is full of stories that are easy to picture. If you can imagine a new image for every sentence, the niche will work.
| Niche | Best format | Why it works |
|---|---|---|
| History & ancient civilizations | Image Beats | People, places, and cause and effect |
| Psychology & human behavior | Image Beats or Shorts | Everyday situations are easy to draw |
| Science explainers | Image Beats | One simple metaphor per line |
| Engineering & machines | Video Clips | Motion and scale carry the story |
| Extreme climates & jobs | Video Clips | Cinematic landscapes do the work |
| Food origins & culture | Image Beats | Stories that span centuries |
| Finance & economy explainers | Image Beats | Abstract ideas turned into simple scenes |
Then pick your language. English is where most creators start, so it’s crowded. A channel in Spanish, German or Japanese can tell the same kind of story to a less crowded audience, and you don’t have to speak the language to run it. We covered that strategy in how to run a YouTube channel in a language you don’t speak.
Keep it narrow at first
For your first 10 videos, stick to one niche, one format and one style. If you change all three at once, you can’t tell what worked.
Step 2: Set up your channel once (style and story rules)
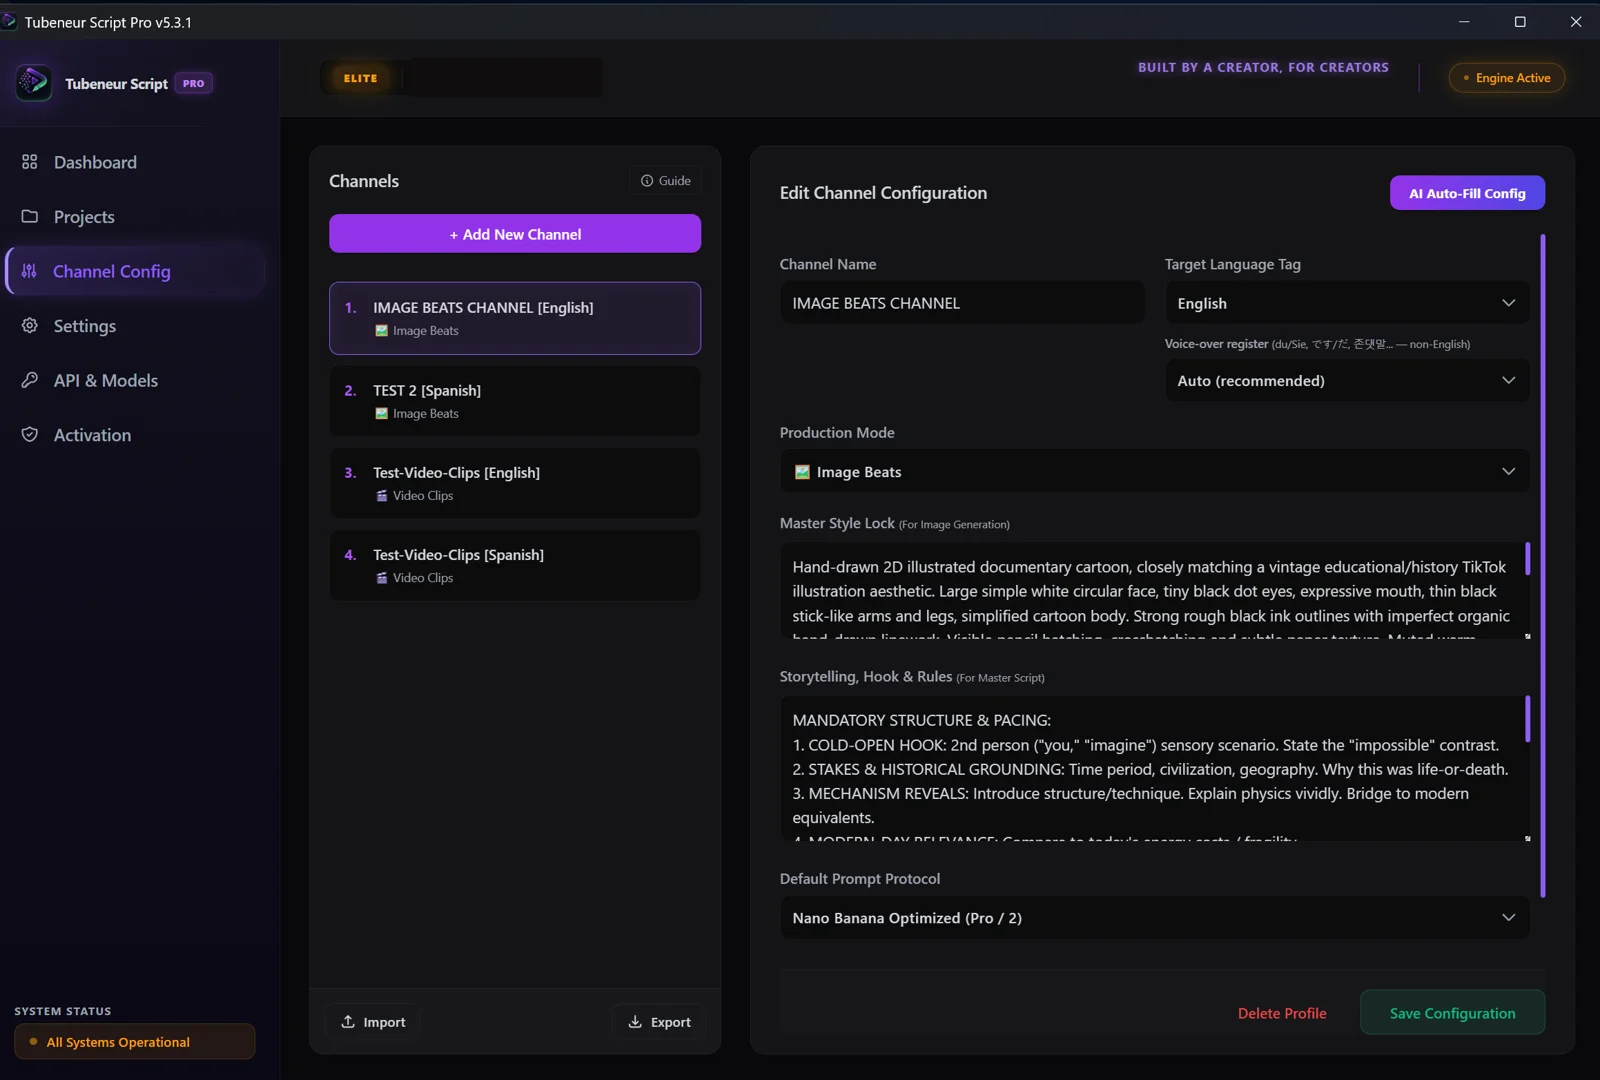
Most guides skip this step. It’s the one that makes a faceless channel look like a real channel instead of a random slideshow. You write two short documents once, and every video after that follows them.
The Style Lock: one look for every picture
Write one paragraph that describes your channel’s look: the line work, the colors, the lighting, the characters and the backgrounds. Then paste that same paragraph at the end of every image prompt. Your image tool gets the same instructions every time, so picture 1 and picture 200 look like they belong to the same channel.
Master Style Lock · stick-figure history channel
2D digital animation with simple stick figure characters and large, expressive facial features. The line work is clean and smooth, featuring solid black outlines with no texturing. The colour palette is muted yet vibrant, with earthy greens, soft blues, light grays, and pops of bright red and orange. Lighting and shading are minimal, giving the scenes a flat, cartoonish feel. Backgrounds are simplified with basic linear perspective, focusing on essential elements and open spaces. Composition often centers around the character, providing a sense of narrative focus and humor within each scene. The textures are mostly flat, avoiding gradients and maintaining a clean, crisp look throughout.Real Style Lock from a sample channel, unedited.
The paragraph is long on purpose. A vague phrase like “cartoon style” makes the image model guess, and it will guess differently every time.
Storytelling rules: one structure for every script
The second document is your story formula: how every video opens, builds and ends. This is the kind of structure we use on a history channel:
Storytelling_Rules.txt
1. COLD-OPEN HOOK: put the viewer inside a scene
   ("Picture this. You are..."). State the "impossible"
   contrast in the first lines.
2. STAKES & GROUNDING: when and where, and why it was life or death.
3. MECHANISM REVEALS: how it worked, one step at a time,
   with a modern comparison for each step.
4. MODERN RELEVANCE: connect it to something the viewer uses today.
5. PAYOFF: answer the question the hook asked, then the call to action.
Save the voice-over register as well: casual or formal. In languages like Spanish or German, that also means choosing whether the narrator says tú or usted, du or Sie.
Step 3: Write an original script
The script is the video. You can regenerate a picture in minutes, but no amount of editing saves a boring script.
- Hook in the first two sentences. Put the viewer inside a scene, or ask a question they want answered.
- One idea per sentence. Each sentence becomes one or two beats, so short, visual sentences make better videos.
- Write numbers the way they’re spoken. Write “fifty degrees Celsius”, not “50°C”. The narrator reads it correctly, and the storyboard matches what the viewer hears.
- Know your length. At a typical narration pace of about 150 words a minute, a 10-minute video needs roughly 1,500 words.
- Check every fact. Take extra care with dates, numbers and “first ever” claims.
Starting from someone else’s video?
Use it as research, not as your script. Pick your own angle, change the structure, add what the original missed, and write every sentence yourself. A translated or reworded copy is exactly what YouTube’s reused content policy targets.
Script Pro’s link input works the same way. It reads the video as source material and writes a new script in your channel’s structure and voice. You still bring your own angle and check the facts.
Master_Script_English.txt · food-history channel
Imagine tossing a smooth almond into your mouth. Now, rewind ten thousand years to its wild ancestor, which could flood your mouth with bitter poison that produces hydrogen cyanide. That’s right—eat a handful, and you’re in serious danger. Yet, early humans faced these toxic seeds, intrigued by the challenge. …Opening of a real Script Pro output. The hook is a scene, then a contrast, then a question.
Step 4: Split the script into beats
A beat is a few spoken words that get one picture or clip. When the words move on, the picture changes. That’s what keeps a faceless YouTube video moving. Pacing is simply how many words each beat gets.
| Pacing | Words per beat | Feels like | Use it for |
|---|---|---|---|
| Snappy | 3–5 | Fast and punchy | Shorts, Reels, high-energy hooks |
| Fast Cut | 5–7 | Steady and modern | Most long videos (a good default) |
| Cinematic | 7–10 | Slow and immersive | Calm documentaries, storytelling |
Split at natural pauses rather than a fixed word count: the end of a clause, a comma, a new idea. If a beat ends mid-thought, the picture changes at the wrong moment.
How many pictures does a 10-minute video need?
More than most people expect. At about 150 words a minute, a 10-minute script is around 1,500 words. At 5–7 words a beat, that’s 200 to 300 beats. Even at cinematic pacing it’s about 150. That’s why doing it by hand is slow: every beat needs its line, its scene number and its prompt.
Write it down as a storyboard
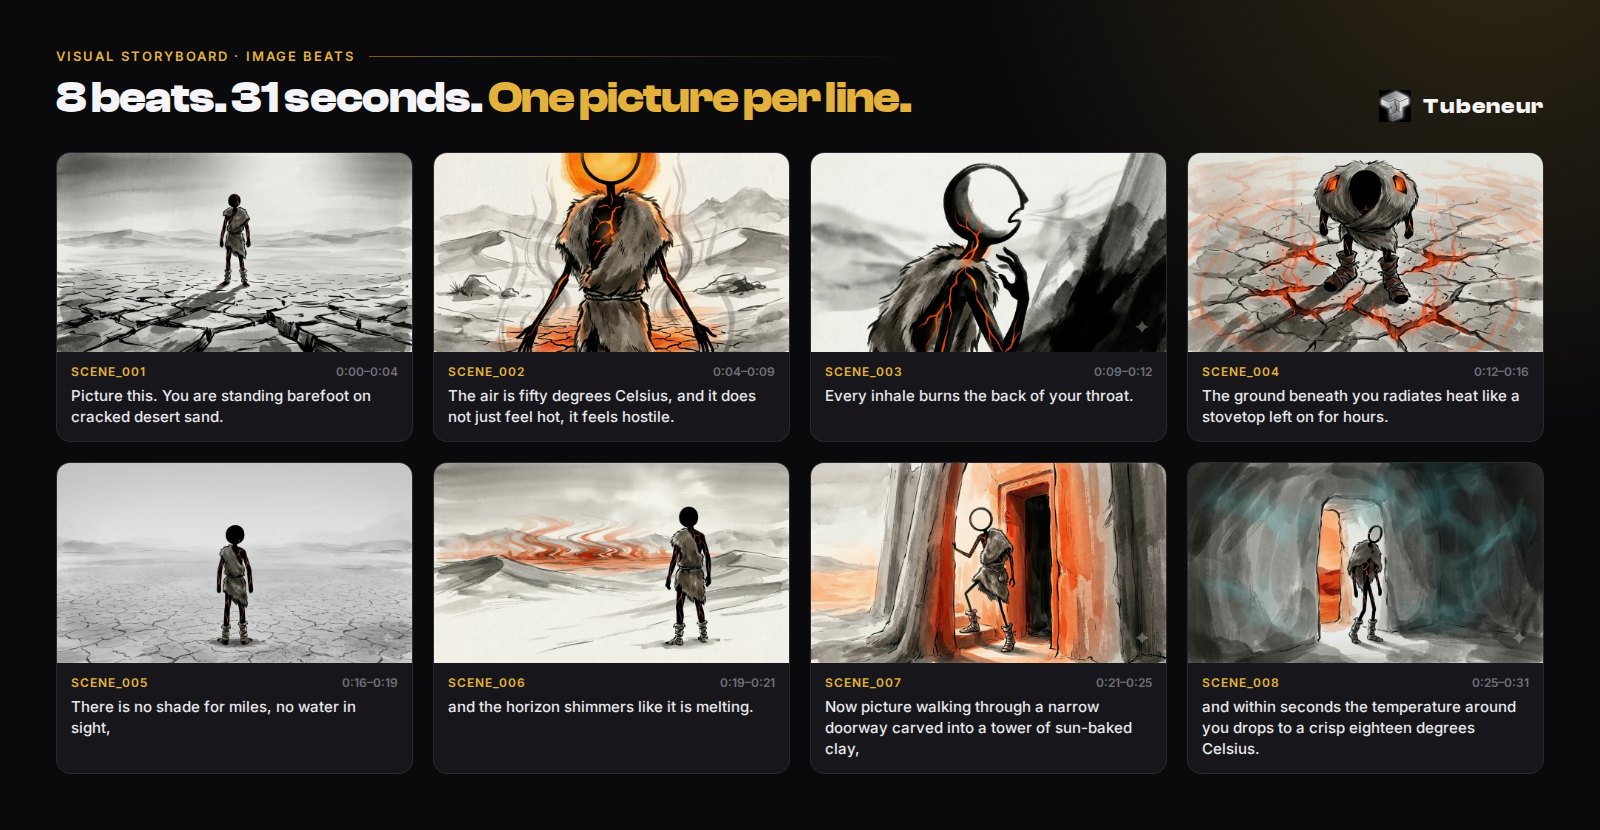
Put every beat into one file: the scene number, the line, and later the prompt. If your channel is in another language, keep the English line beside each translated line. Then you can always check what the narrator is saying.
Bilingual_Visual_Storyboard.txt · Spanish channel
Scene_001
EN  Imagine tossing a smooth almond into your mouth.
ES  Imagina que lanzas una almendra lisa a tu boca.

Scene_002
EN  Now, rewind ten thousand years to its wild ancestor,
ES  Ahora, retrocede diez mil años hasta su ancestro silvestre,

Scene_003
EN  which could flood your mouth with bitter poison
ES  que podía inundarte la boca con un veneno amargo

Scene_004
EN  that produces hydrogen cyanide.
ES  que produce cianuro de hidrógeno.
Real Script Pro output (formatted for reading). Every Spanish line has its English meaning beside it.
Step 5: Write one prompt per beat
Now each beat gets a prompt: the instruction your image or video tool works from. A good beat prompt has two parts:
- The scene action. What happens in this exact beat: who, doing what, where, and with what emotion.
- The Style Lock. Your paragraph from Step 2, pasted at the end without changes.
Batch_Prompts.txt · Scene_001
[Scene action]
A stick figure character is shown biting into a large, cartoonish almond, with a disgusted expression; the almond is depicted with exaggerated features, in a simple, muted landscape.

[Master Style Lock, appended to every prompt]
2D digital animation with simple stick figure characters and large, expressive facial features. The line work is clean and smooth, featuring solid black outlines with no texturing. …
Real Script Pro output for the first beat of the almond video.
Image prompts vs. video prompts
An image model needs a frozen moment. A video model needs movement: a camera move, an action, or something that changes over a few seconds. So the same kind of beat is written differently for each.
Visual_Storyboard.txt · engineering channel (Video Clips)
Scene_001  "In the bone-chilling depths of an Alaskan winter,"
           → Wide shot of a snowy Alaskan landscape, icy winds blowing, dark sky overhead.

Scene_002  "where temperatures drop to a staggering minus forty-five degrees,"
           → Close-up of a thermometer displaying minus forty-five degrees, frost forming.

Scene_003  "a freight train crew faces an extraordinary challenge."
           → Medium shot of a crew huddled together beside a freight train, determined expressions.
Real Script Pro output: the line on the left, the clip prompt under it.
Each engine also reads prompts in its own way. Nano Banana and GPT Image differ, and so do Veo and Seedance. Script Pro writes the prompts for the engine you choose: Nano Banana or GPT Image for pictures, Veo 3.1 or Seedance for clips.
Name files by scene
Keep the scene number in every file name: Scene_001.png, Scene_002.png, and so on. When you edit, the files land on the timeline already in order.
Step 6: Make the pictures, clips and voice-over
Now you generate. Use whichever tools you like, because every image and video tool accepts a text prompt.
- Generate in batches. Paste the prompts in order and save each result with its scene number.
- Check each picture against its line. A beautiful picture that doesn’t match its line breaks the story, so regenerate it.
- Record or generate the voice-over. Use your own voice, a hired narrator or an AI voice. Read from the voice-over script, not the storyboard.
- Listen once before you edit. Fix wrongly pronounced names and numbers now, because it’s harder after the cut.
Making a channel in another language? The voice-over script is written in that language, and the bilingual storyboard shows the English meaning of every line. So you can check the recording even if you don’t speak a word of it.
About voices
Don’t clone a real person’s voice. If a voice could make viewers believe a real person said something they didn’t, YouTube requires the disclosure label, and you may need that person’s permission too.
Step 7: Edit beat by beat (and cut the Shorts version)
Editing a faceless YouTube video is mostly placement, because the storyboard already tells you what goes where.
- Put the voice-over on the timeline first. Everything else follows the voice.
- Drop each picture where its line starts. Scene_001 goes under the first line, Scene_002 under the next, and so on.
- Add gentle motion to still images. A slow zoom or pan keeps an illustration alive for the few seconds it’s on screen.
- Add sound. Keep a quiet music bed under the voice, and add a few sound effects at the moments that matter.
- Add captions. Plenty of viewers watch with the sound off, especially on phones.
- Watch it once at full speed. Wherever your attention drifts, tighten the edit.
The Shorts version
Take your strongest 30–60 seconds. Switch to vertical 9:16 and Snappy pacing (3–5 words a beat), and open on the most surprising line.
Frame each image for a phone screen by keeping the subject in the middle. End on a line that makes people want the long version.
Coming from Tubeneur
VisualBeats is in testing now. It’s built to do this edit for you, matching the pictures to the voice beat by beat.
Step 8: Title, thumbnail and upload
- Title: promise the answer to the question your hook asks. Clear beats clever.
- Thumbnail: one strong image from your beats, one focal point, and three or four words at most.
- Description: two lines that sum up the video, then your sources if you used any.
- Chapters: add a timestamp at each big part of your story formula.
- Disclosure: switch on the altered or synthetic content label when it applies (see the rules above).
- Schedule: choose an upload rhythm you can keep for months, not a sprint you’ll give up on.
Make the same video for a channel in another language
Once the English master script exists, you’re most of the way to a second channel. The story and its beats carry over. Each channel gets its own voice-over script, written for its language, and can have its own art style, titles and thumbnails.
Here’s one story on three channels, each with its own look:
This isn’t YouTube’s auto-dubbing. Auto-dubbing adds a second audio track to your English video. A native channel is built for its audience, from the title down. For why that matters and which markets to consider, read running a YouTube channel in a language you don’t speak.
How long it takes
The honest answer: how long it takes to make faceless YouTube videos depends on which parts you do by hand. Here’s what changed in our own workflow.
Prep for one 10–12 minute video
2–3 hours → 15 minutes
That covers the script, the voice-over script, the storyboard and every prompt. We measured it on the founder’s own Image Beats channels. Making the pictures, recording the voice and editing come on top.
It used to go one piece at a time. First the script, then the voice-over version, then proofreading, then the storyboard, then the prompts one by one. Now a single run produces all of them together.
Where Script Pro fits
Script Pro is the Windows app we built to do Steps 3 to 5 in one run. Paste a YouTube link, a transcript or your own script. On the Elite plan you can also start from just a topic. You get these files:
Master_Script_English.txt: an original script in your channel’s structure and voiceVoiceover_<Language>.txt: the voice-over script, in any of 75 languagesVisual_Storyboard(TXT + PDF): every beat, with the English line beside each translated lineBatch_Prompts.txt: one prompt per beat, with your Style Lock, written for your image or video engine
It writes text and prompts. You make the pictures, clips and voice with your own tools, then edit. You pay once, with no subscription. A free mode runs on a free Google Gemini API key.
7 mistakes that sink faceless channels
- Changing the art style every video. Viewers recognize a channel by its look, so lock it.
- Pictures that don’t match the words. If the line says the ground radiates heat, show the ground, not a sunset.
- Holding one image too long. A still picture that stays on screen while the story moves on is where viewers leave.
- Rewording someone else’s video. That’s reused content, and it isn’t your story to tell.
- Unchecked facts. One wrong date in the comments loses more trust than a good video earns.
- Digits in the script. “1850” can be read aloud several ways, so write exactly what the narrator should say.
- Uploading in bursts. Ten videos in a week and then a month of silence is hard to grow from. Keep a steady rhythm.
FAQ
Can faceless YouTube channels make money?
Yes. A faceless channel can join the YouTube Partner Program like any other channel, as long as it meets the requirements and follows the monetization policies. YouTube demonetizes mass-produced, repetitive content, not channels without a face. Earnings depend on the niche, where the audience lives and the views, so be wary of anyone who promises a number.
Can I use AI images and AI voices?
Yes. YouTube allows AI-made content, but it has to add original value, and realistic content that could mislead viewers must be labelled. Illustrated and animated styles usually don’t need the label.
How many images do I need for a 10-minute faceless YouTube video?
Roughly 150 to 300, depending on pacing. At about 150 spoken words a minute and 5–7 words per beat, a 10-minute video has 200–300 beats. Slower, cinematic pacing brings it closer to 150.
Can I run a faceless channel in a language I don’t speak?
Yes, as long as every line of the script comes with its English meaning so you can check it, and the voice-over sounds natural in that language. Our full guide covers it: running a YouTube channel in a language you don’t speak.
What’s the easiest faceless format to start with?
Image Beats. Images are usually cheaper and faster to make than video clips, one style is easy to keep, and the format works in almost every niche. Move to Video Clips once your storytelling works.
Can I make faceless YouTube videos for free?
Close to it. Many image and voice tools have free plans, and DaVinci Resolve’s free version handles the edit. Script Pro is a one-time purchase, and its free mode runs on a free Google Gemini API key, so you don’t pay for AI on each video. The real cost is your time, which is why the workflow matters.
Start with one story
You don’t need a studio or a face on camera. You need one niche, one look and one story formula. You also need a workflow that turns every script into beats, prompts and pictures without eating your whole week.
Set up your channel once. Make one video beat by beat. Then make the next one faster.
See what one link turns into
Real videos made from Script Pro files: Image Beats, Video Clips and Shorts, in English, Spanish and Russian.